This tutorial explains in simple steps how to make calls with the Wildix for Zendesk integration. The most common functions are covered, for those that are not described refer to the "Get help" button at the bottom left of collaboration or check our help page.
![]()
This instruction covers the following topics:
- Login in collaboration
- Setting up the headset
- Contact center
- Wildix collaboration
- Overview of colleagues separated into groups or departments
- Overview of shortcut keys
- Login Wildix for Zendesk app
- Making calls with the Wildix for Zendesk app
- Incoming calls
- Registration of voice recording in ticket
- Transfer incoming call
Wildix for Zendesk provides call center functionality and gives you the tools to take control of your phone system.
Before you can make calls, you will receive by email the link and login details for the online environment of Wildix collaboration. This application is required to make calls in Zendesk.
You start Wildix Collaboration from the browser, always use the Chrome browser for an optimal experience and make sure you are always logged into collaboration when making calls in the Wildix Zendesk application.
Login in collaboration
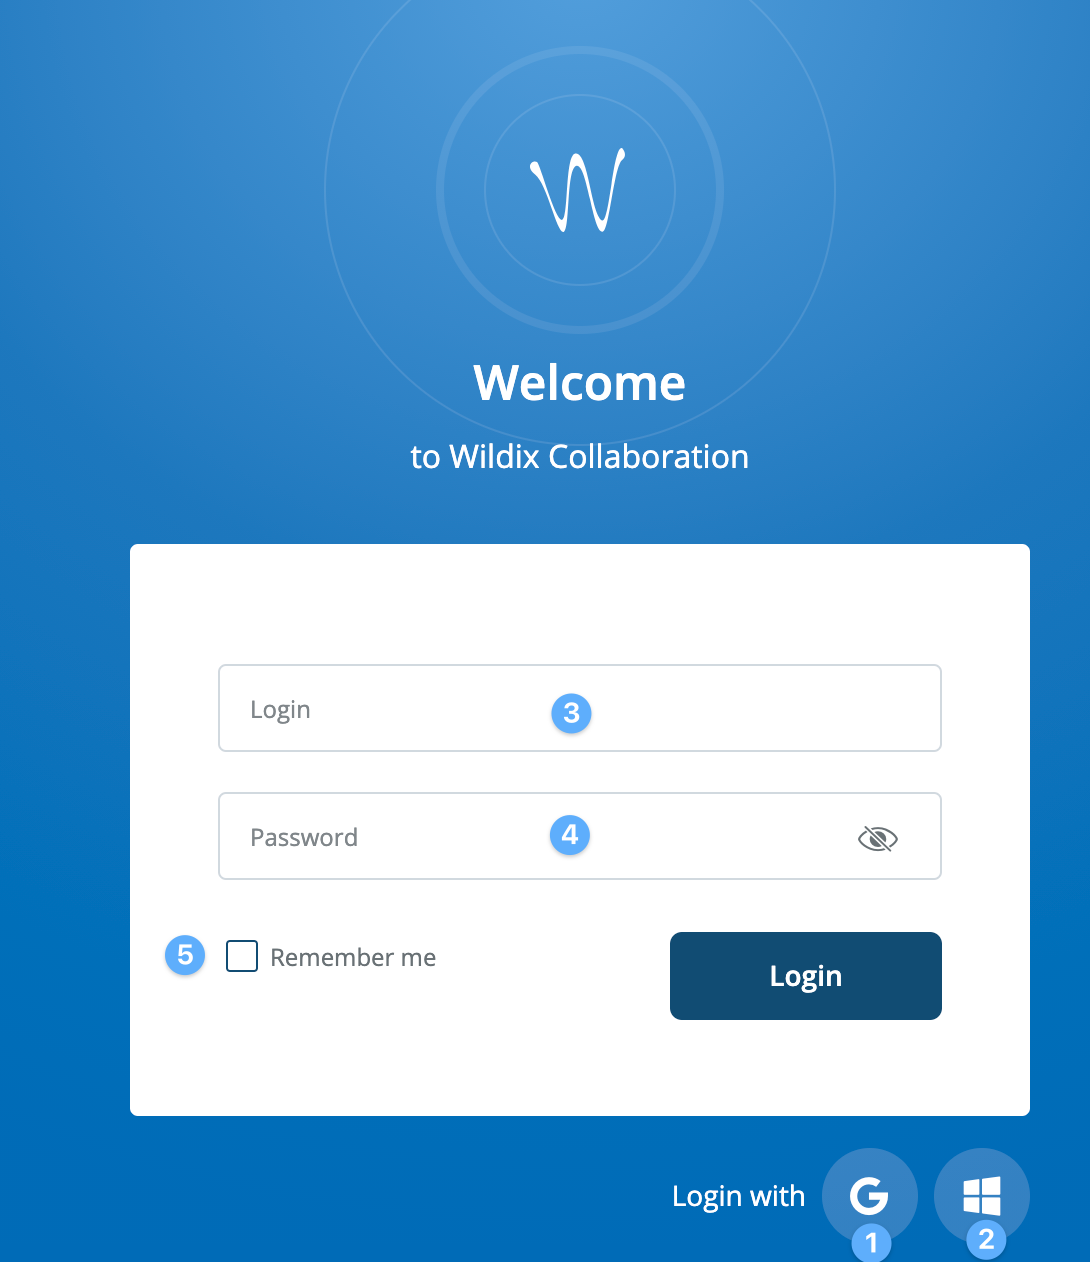
Login can be done in three ways, either with a Google Mail account or a Microsoft Office 365 account. In the welcome email you will receive the password and extension number to log in. The extension number is your short phone number by which you can be reached by your colleagues.
- Login with a Google Mail account
- Login with an Office 365 account
- Enter extension number
- Password
- Save the password and extension number
Setting up the headset
After logging in a check is required to set up the headset and test it with the echo button. Is the headset connected, go to settings and follow the settings.
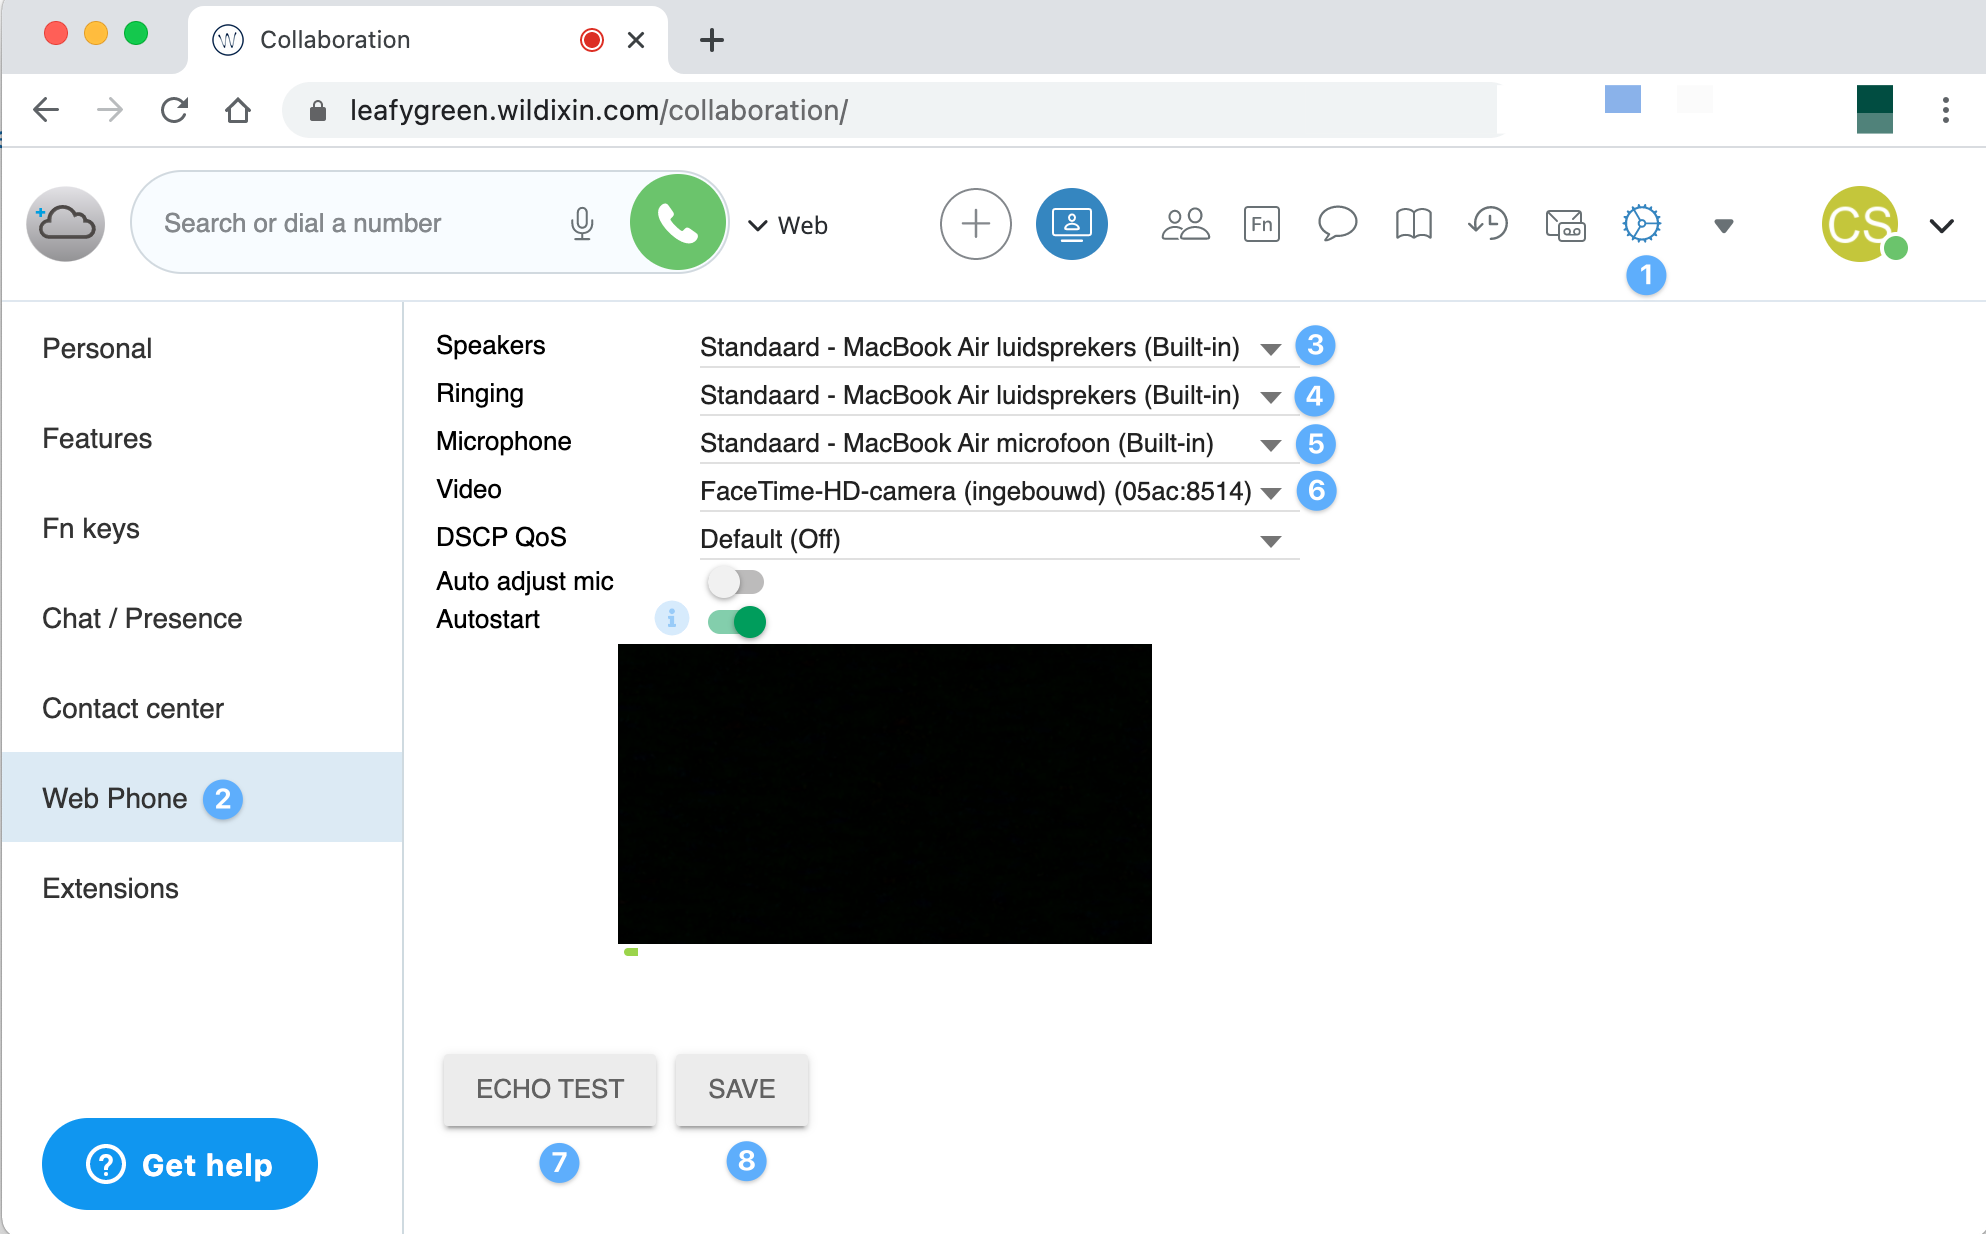
- Go to settings
- Choose Web Phone
- Sound going through the speakers of the headset
- Call signal is hearable in headset or through computer/laptop speakers.
- Choose microphone of the connected headset
- If necessary, set up the camera via laptop or computer here
- Echo test to check if both microphone and headset are set correctly
- Save the settings
Contact center
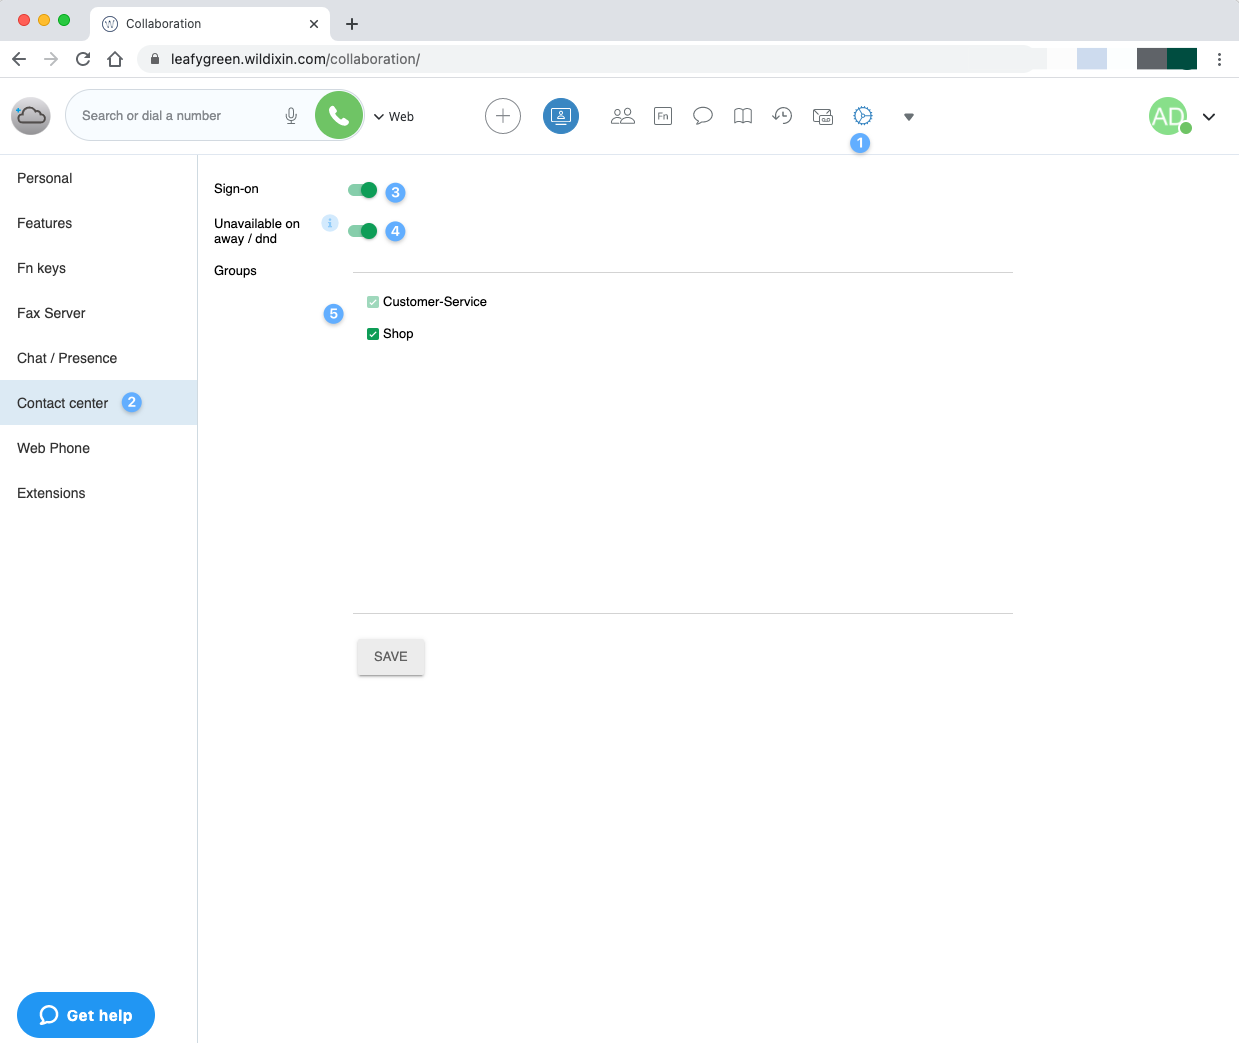
If your organization uses dynamic or fixed call groups you have the option to log in and out of the call group yourself. You can configure this under Contact center, make sure you are logged in "sign-on" and "Unavailable on away" is active. Then select in which group you want to receive the incoming calls. If you do not have this option, then you are locked into the call group and dynamic logging in and out, is not possible.
- Go to Settings
- Go to Contact Center
- Activate Off and on in the call group
- Activate Off and on current status in the calling group
- Select the call group where you want to receive the incoming callers. If you cannot activate this checkbox it means that you are locked into the call group and the dynamic login feature is then not activated
Wildix collaboration
Select (1) which application will be used to make the call, through a landline, web or all at once. If you only use a headset then always select web
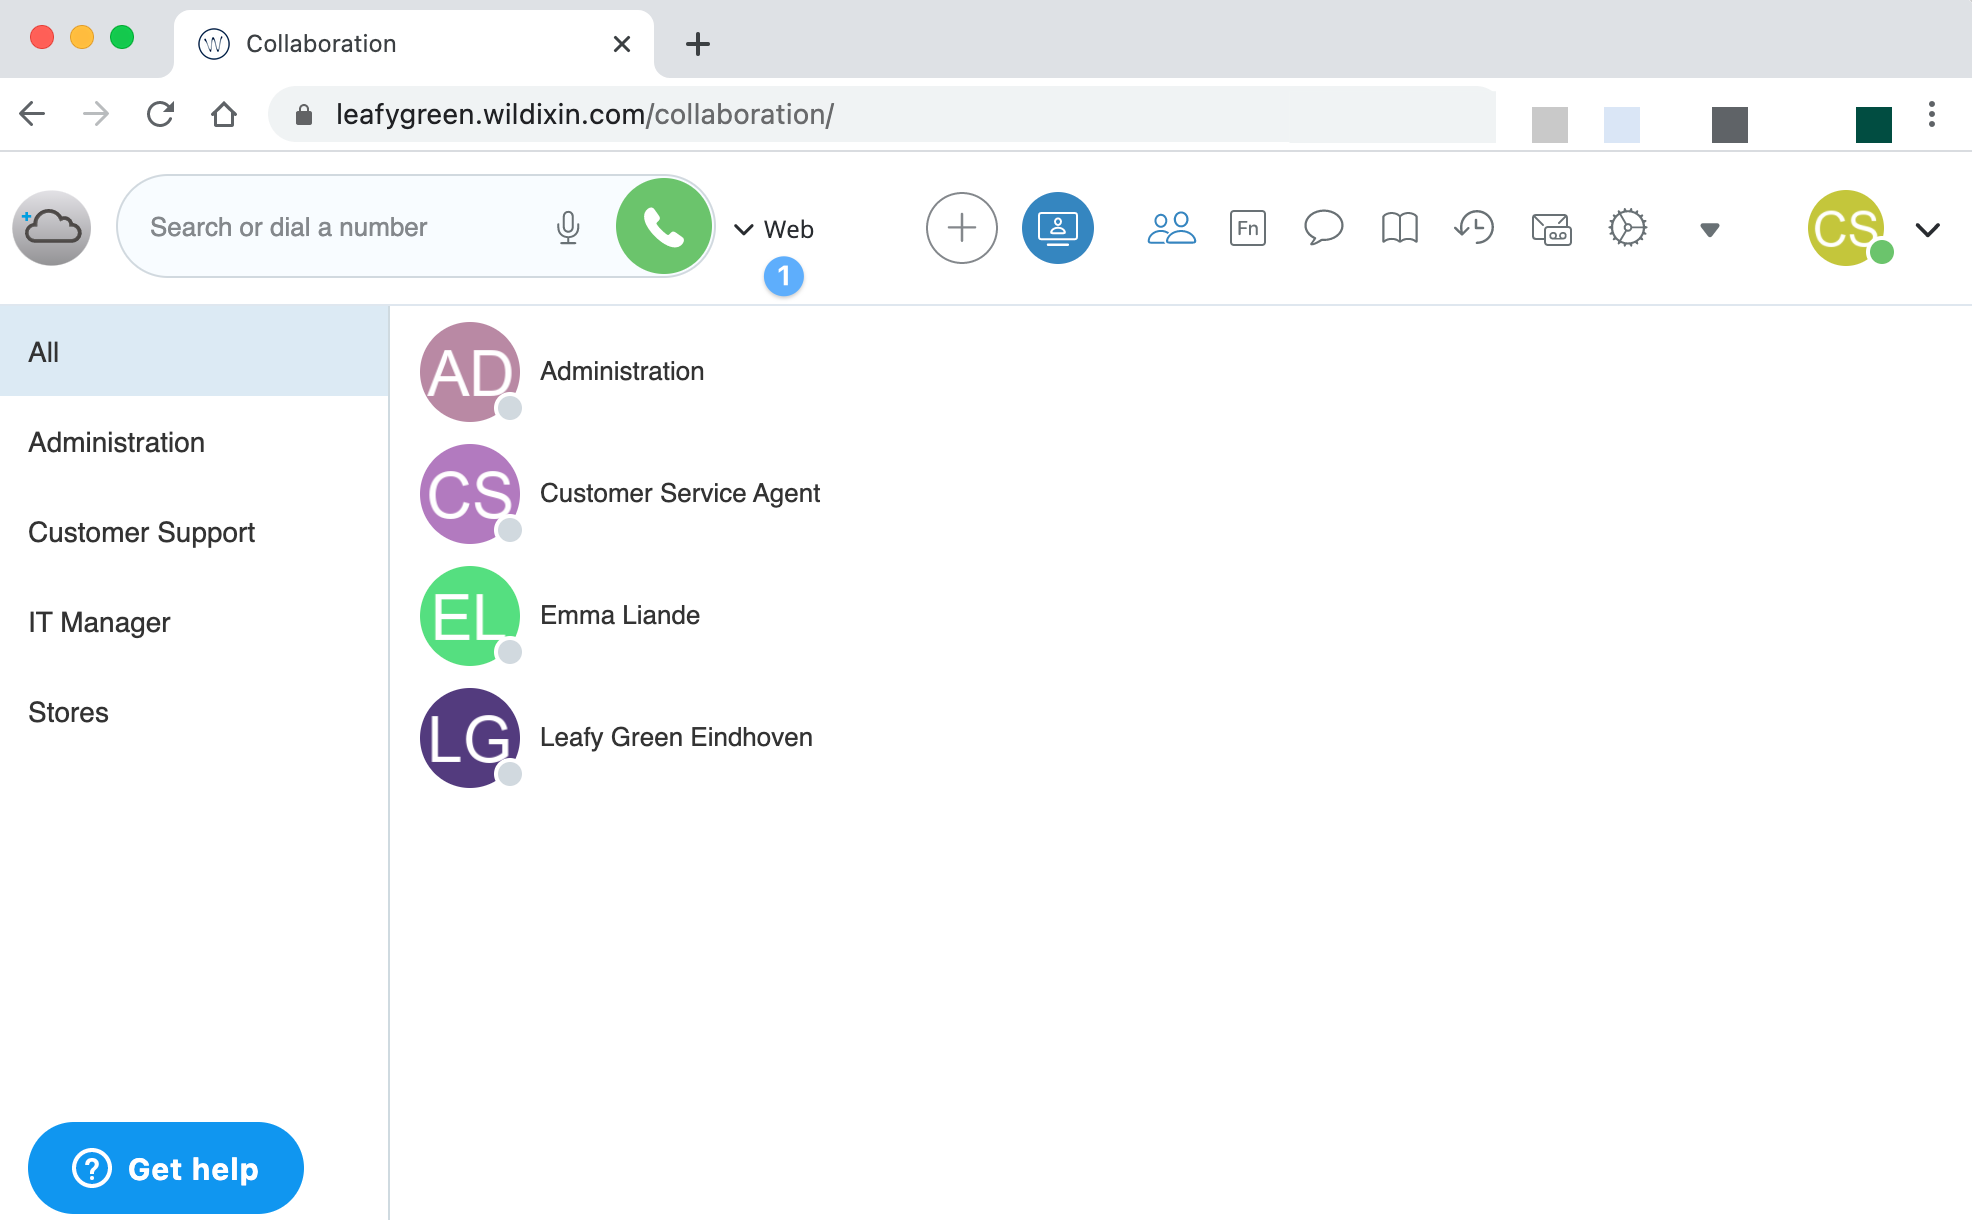

- Entering phone number or name
- Button to activate calling
- Overview of colleagues divided into groups or departments
- Shortcut keys
- Chat functionality
- Call history, in- and outgoing call traffic of the user
Overview of colleagues separated into groups or departments
For the online status of all or some colleagues, go to colleagues in the overview. When you start collaboration for the first time, add your colleagues in the steps below.
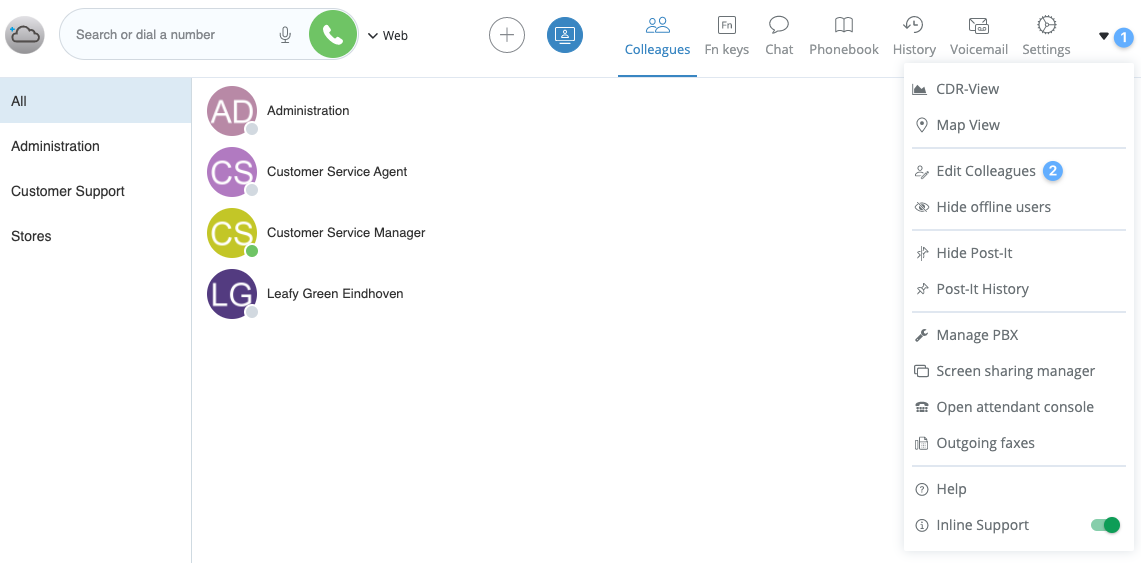
- Select the down arrow
- Select (2) edit colleagues
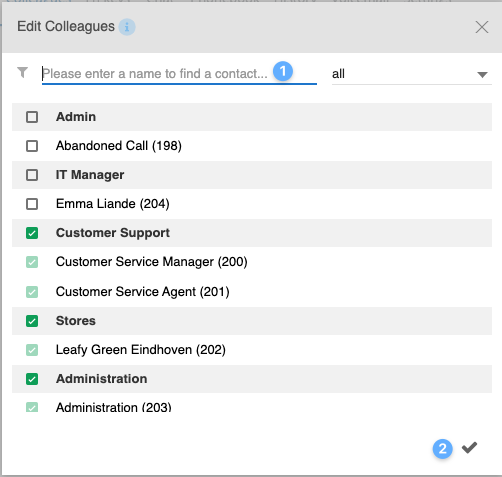
- In the search field you can search for your colleague or group by name.
- Check (green checkmark) the group and people of your choice and confirm.
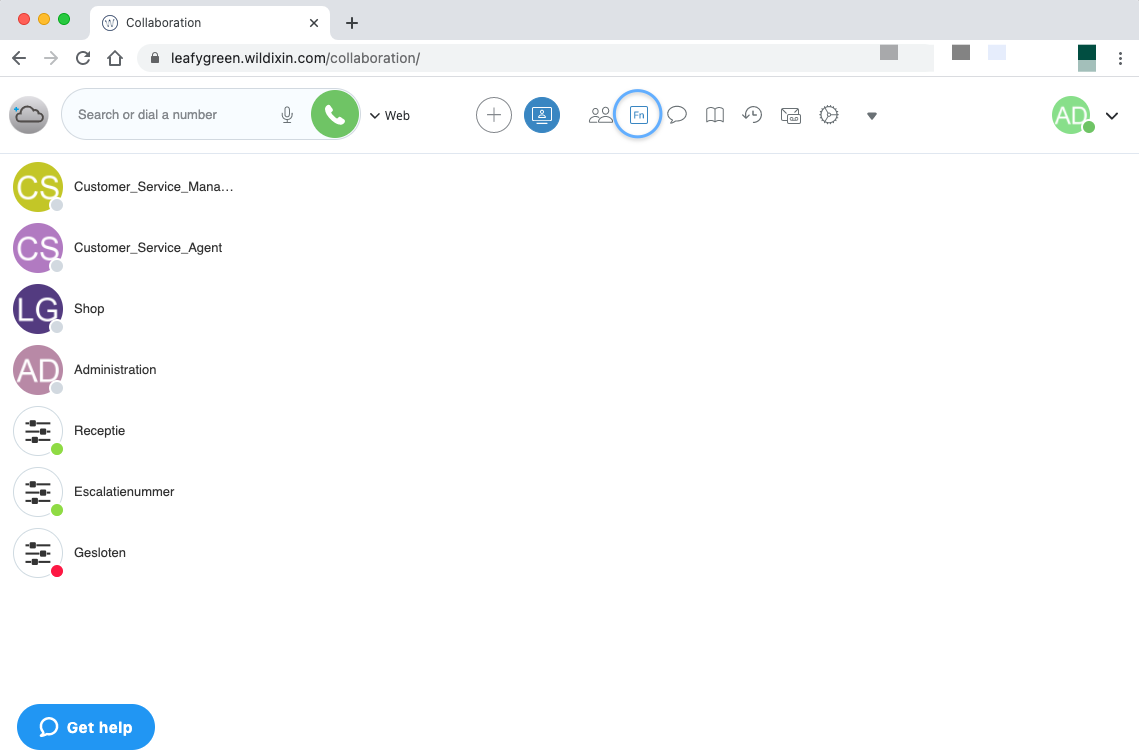
Overview of shortcut keys
Under FN are all the speed dial buttons (when configured). With these buttons you can directly call a call group or activate certain settings. For example, if there is an escalation and an additional message needs to be played or a transfer to another number then this can be done via a hotkey. On request we can configure this for you.
Login Wildix for Zendesk app
After logging into Wildix collaboration, go to the Zendesk dashboard and log in with the same login credentials as in Wildix collaboration. If no login account is visible in your Zendesk environment, ask your team leader or responsible person with admin rights in Zendesk that this is still activated.
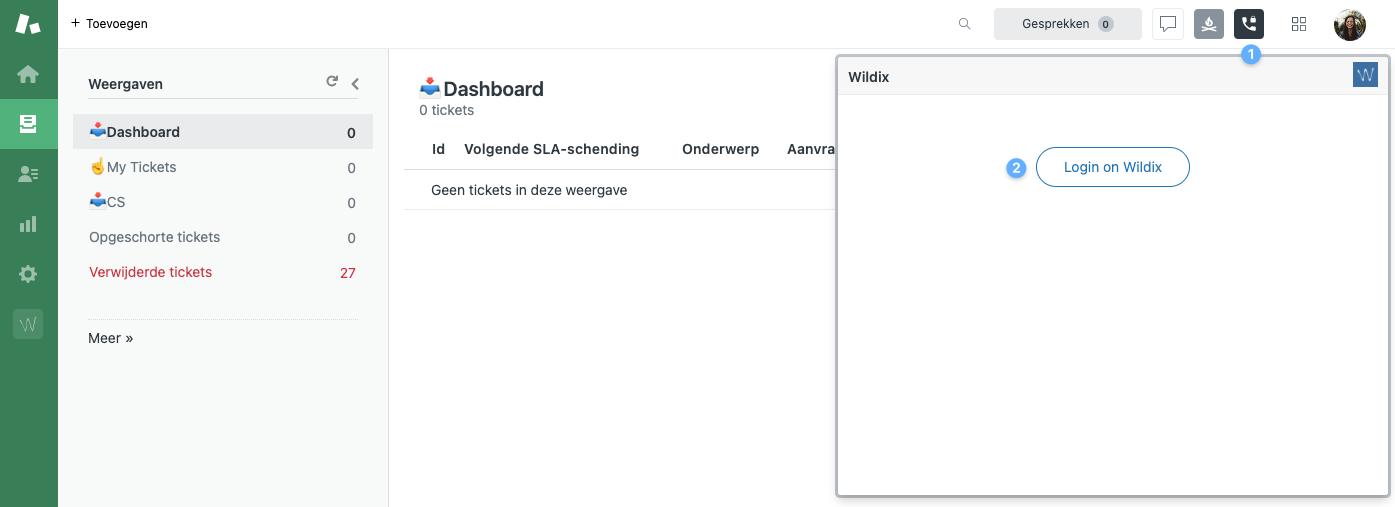
- Activating the Wildix for Zendesk app
- Login with extension and password
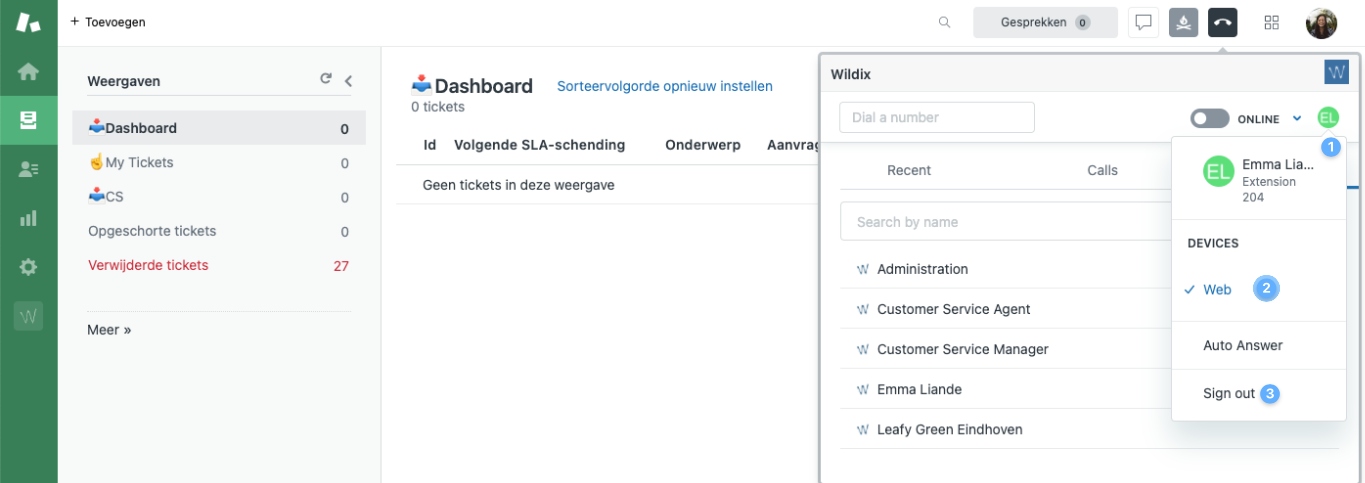
When logged in select on your profile 1. and choose here as device Web 2. if not checked.
To logout, choose Sign out 3.
Making calls with the Wildix for Zendesk app
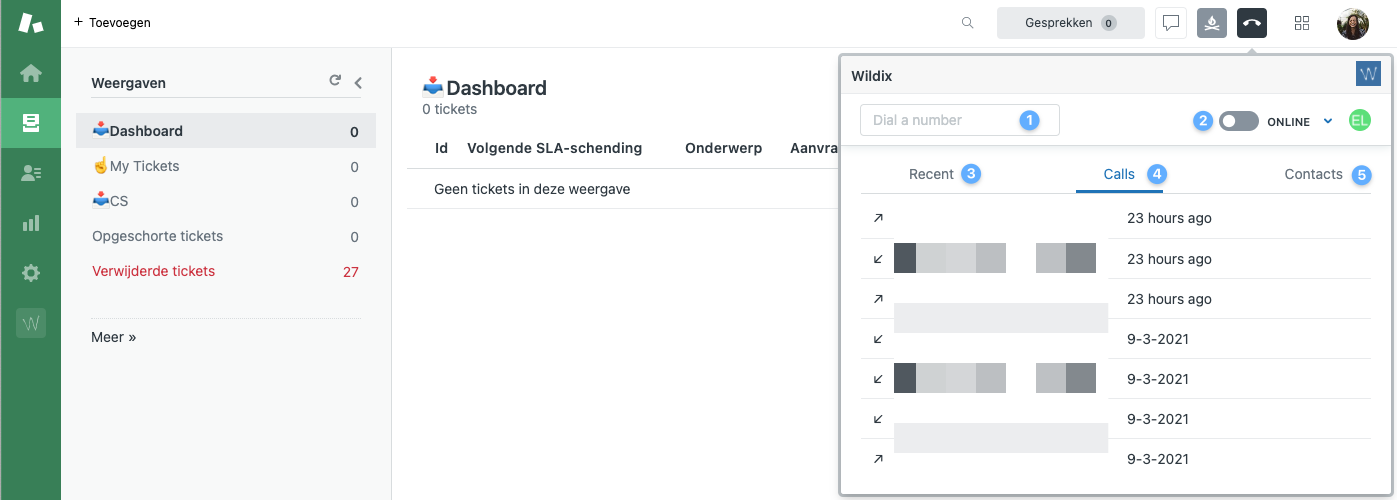
- Input field for phone number or name
- Customize Status online, DND or Away
- All recent incoming and outgoing calls
- All incoming and outgoing calls
- Contacts and colleagues
Incoming calls
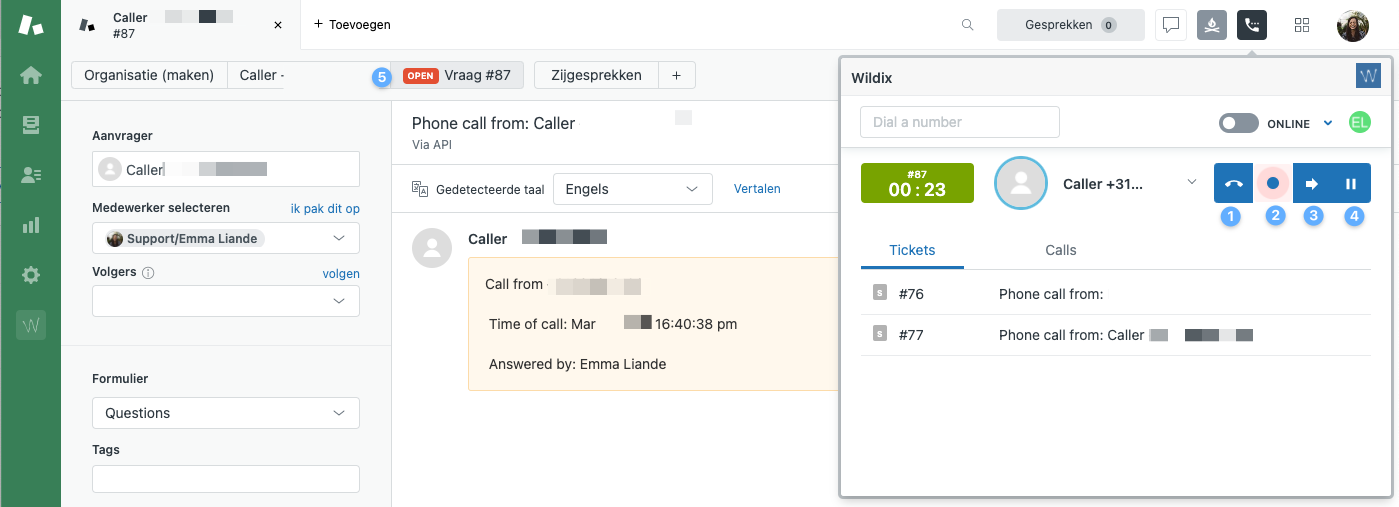
- Disconnect call
- Record call to listen back later, when not set up automatically
- Transfer call hot or cold
- Pause call
- New ticket is automatically opened in Zendesk when there is an incoming call
Registration of voice recording in ticket
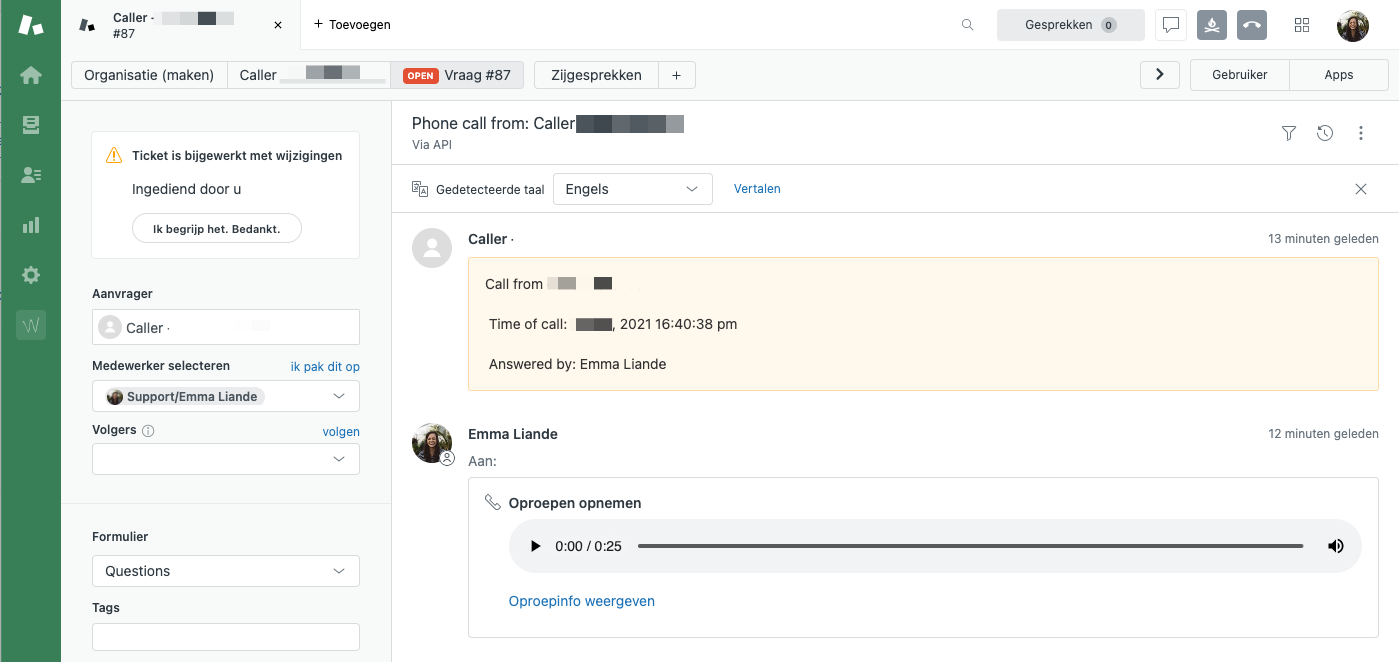
After a call, the recording of the call is automatically added in the ticket.
Transfer incoming call
For an incoming call, follow the steps below if the call is to be transferred.
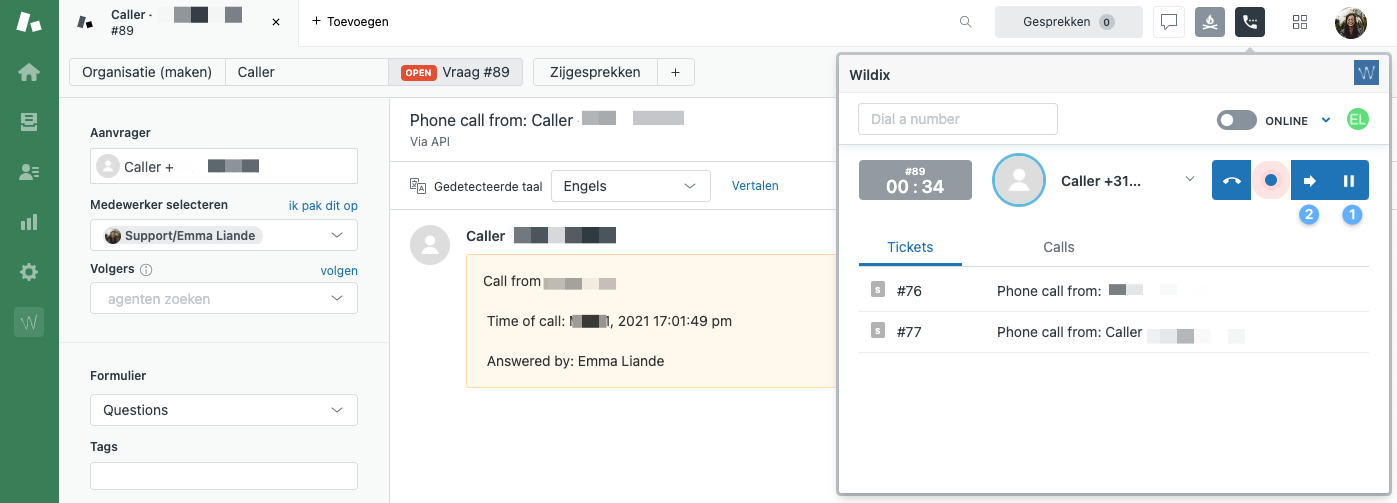
- When transferring a call first select pause
- Select transfer
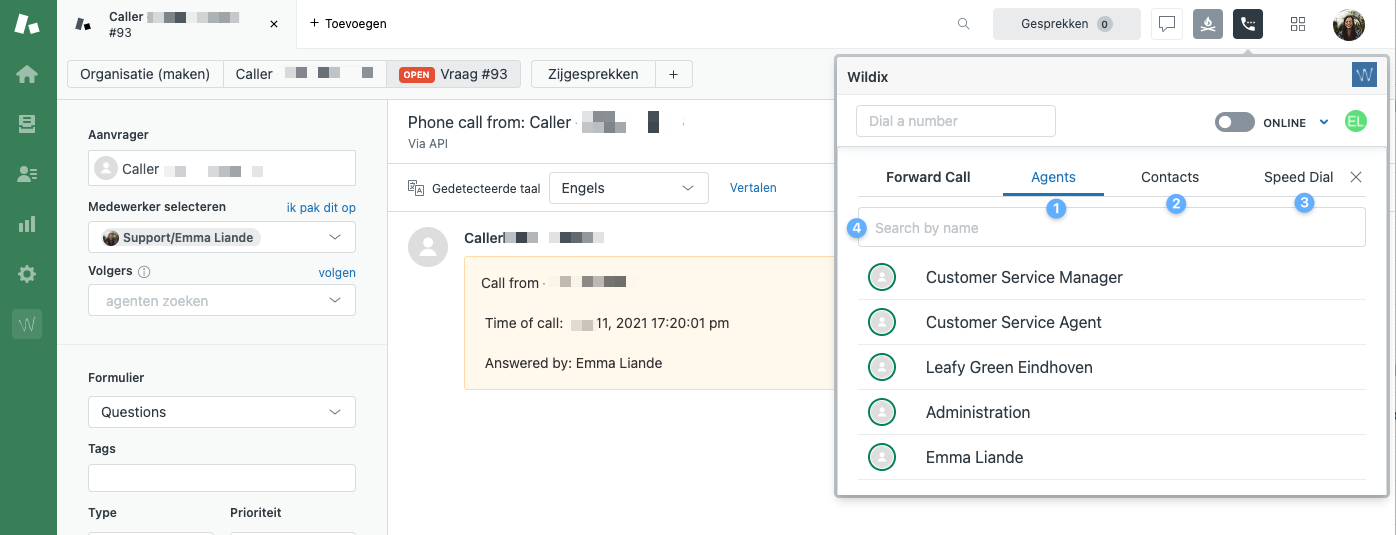
When transferring, there are several choices:
- Transfer to your colleagues
- Transfer in the contact overview
- Transfer to the speed-dial groups (if configured)
- Search field for your contact or colleague
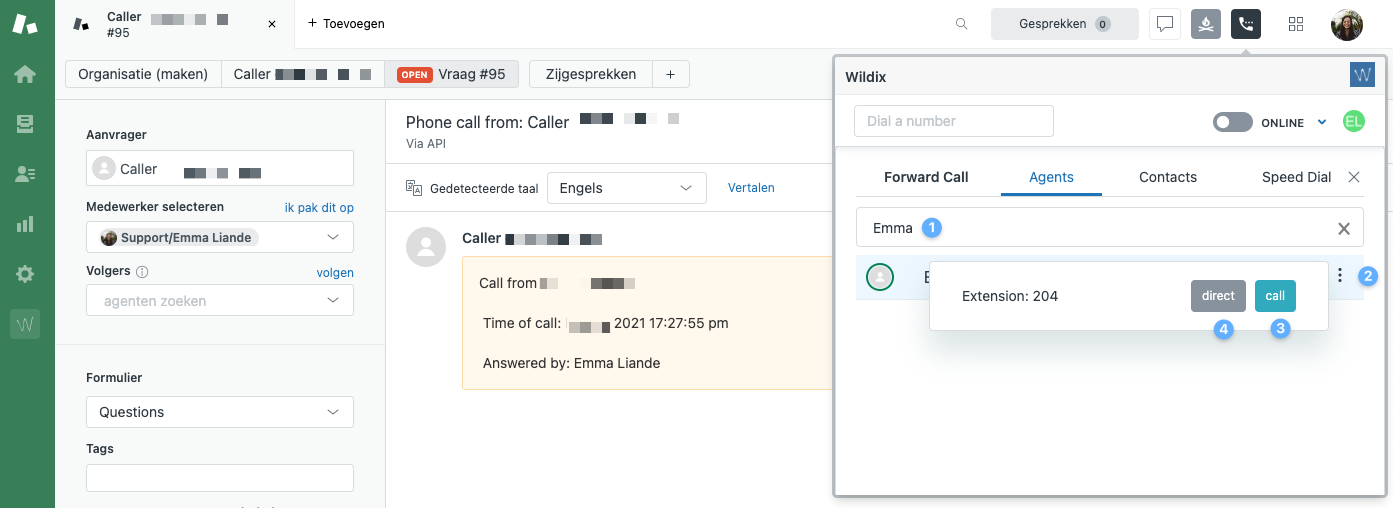
After making a selection, choose direct (cold) or call (warm) transfer:
- Enter the name of your contact/colleague here
- Select here for transfer
- Hot transfer with pre-announce
- Direct transfer without pre-announcement
For questions and/or comments, please contact us via chat, email help@pluscloud.nl or call
+31(0)40-4014004 the chat functionality can be found in Wildix collaboration.
